I had chance to experiment with the Adaptive Wide Angle Filter in Photoshop CS6 for the first time recently. While widely promoted for its ability to straighten lines curved by the distortion of wide-angle lenses. I found it extremely helpful in correcting perspective and removing distortion in faces. While I learned the use of this filter mostly by trial-and-error, there is an excellent tutorial by Adobe Press.
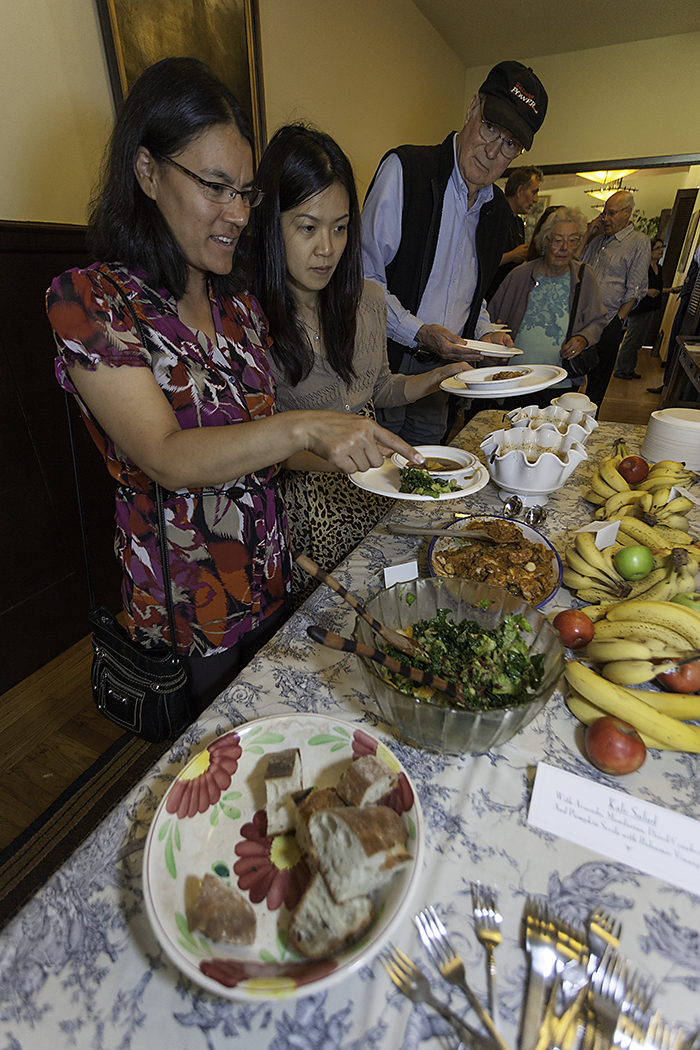
For example, I wanted to capture people in a buffet line at a church event. Using the Canon EF 17-40mm at a focal length of 17mm on my Canon EOS 5D produced an interesting perspective, as shown in the following image.

I liked the perspective, however there are two problems (that are relevant to this post!). First, lines that are supposed to be either horizontal or vertical are at odd angles. Second, the faces of the people in the foreground are distorted; they seem drawn longer and thinner than seems natural.
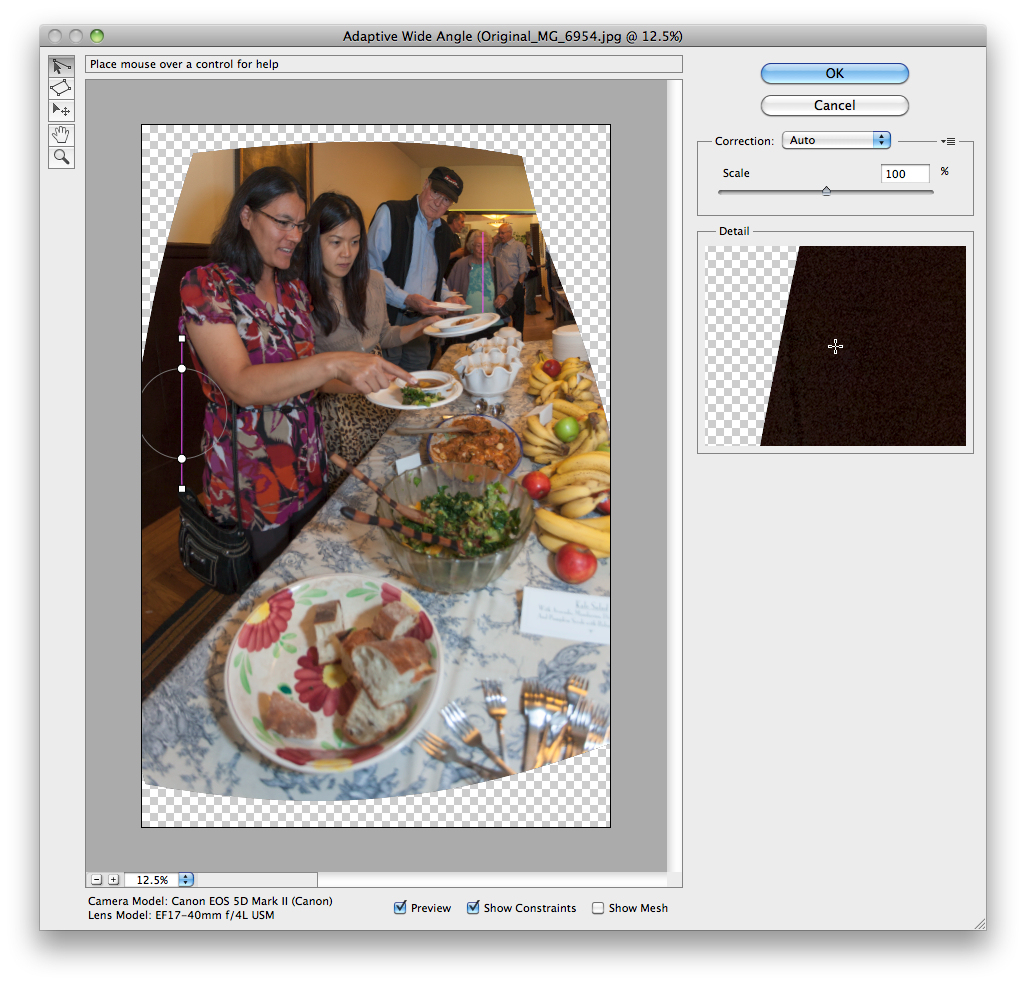
Since this is partially due to the use of a relatively extreme wide-angle lens, I brought the image into Photoshop CS6 and clicked Filter>Adaptive Wide Angle. The image opens in a separate window as shown below.

Note that the filter has examined the EXIF data associated with the file and determined the camera and lens used to obtain this image. This is displayed in the lower left corner. Photoshop contains a profile for this lens so the correction method is set to “Auto”, as seen in the upper right. Notice that the edges of the image are not straight. This is because the filter has already applied corrections to the distortions the lens is known to introduce.
I then identified lines or objects I wanted to straighten or make vertical or horizontal. I started with the strap on the purse of the lady closest to the camera. I first selected the “constraint” tool from the tool pallet in the upper left. It is the top tool. Using the tool, I dragged the cursor along the strap. A line appears with two squares at the end. These squares can be used to move or extend the line if needed. Also present is a circle and two discs where the circle intersects the line. These discs can be used to rotate the line to an arbitrary angle. But since we know this line should be vertical, there is an easier, more precise method: Right click on the line and select “Vertical” from the fly out menu. This constraint can be seen near the left border of the image in the next picture.
Additional constraints were added the make the silver-haired lady in the background stand up straight, and to make the top of the doorway in the background horizontal. All of the vertical constraints show up as purple lines and all of the horizontal constrains show up as yellow lines. In addition to constraining the lines to the vertical or horizontal, the filter will automatically remove any curvature introduced by the lens.
After these three constraints were applied, the image looked like this:

Additional constraints could be applied to tweak the image, but I decided this was good enough and clicked “OK” to return to Photoshop.
Notice that in the process of distorting the image to fulfill my constraints, some large gaps were introduced along the edges of the photo. This required some severe cropping, resulting in the next image.

As you can see, there was no way to eliminate all of the gaps by cropping without cutting out key image elements. Clearly, if one intends to use the Adaptive Wide Angle filter, the original image should contain much more than is intended to be in the final image. Contrary to what we are usually taught, close cropping in camera is undesirable in this case! To obtain the final image, the gaps were filled using a combination of Content-Aware Fill, the Clone tool, and the Patch tool. The final result is here:

The “before and after” image is shown below:

While lines that are supposed to be horizontal are now horizontal, and lines that are straight are now straight, what I like most about the processed image is that the faces look more natural and not long and drawn.
I wish I had gotten the bowl of bread in the foreground in focus, or removed it entirely. However, it does serve to demonstrate how the Adaptive Wide Angle filter has caused the bowl to be more round and less oblong.
The Adaptive Wide Angle filter essentially adds perspective to the image locally. And in some respects this results in the image having even more exaggerated perspective than even the 17mm lens introduced. The figures at the rear of the line have receded even further into the background, while foreground objects are even larger, proportionally. This can be used to good effect, or can be objectionable.
Since I enjoy making wide-angle images — it was one of the primary reasons I upgraded to the full frame Canon 5D — I expect to be putting the Adaptive Wide Angle filter to a great deal of use!

